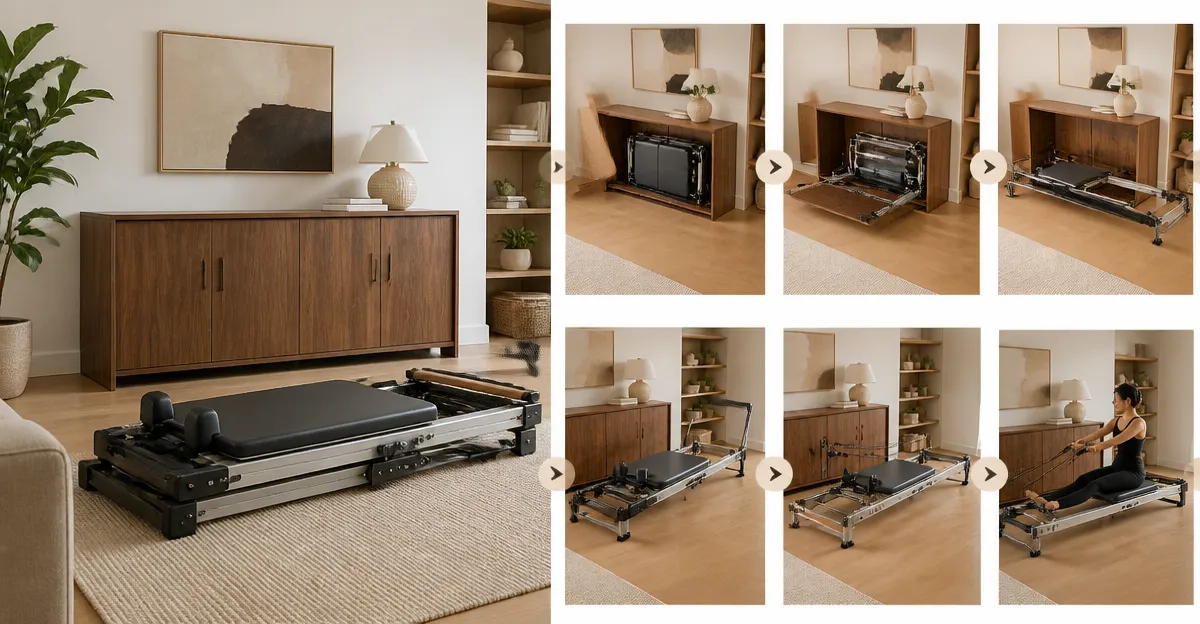
How to Integrate a Foldable Reformer into Multipurpose Furniture: Space‑Saving DIY for Small Home Gyms
Introduction
In compact living spaces, a full‑size Pilates reformer often appears impossible without sacrificing valuable square footage. This guide teaches readers how to incorporate a foldable reformer into a piece of multipurpose furniture, such as a storage bench or wall‑mounted unit. By following the steps, one will preserve workout quality, maintain aesthetic harmony, and avoid the recurring cost of a gym membership. The instructions are practical, cost‑effective, and adaptable to a range of budgets and skill levels.
What You’ll Need
- Foldable Pilates reformer (recommended models listed below)
- Sturdy wooden or metal frame components (2×4 lumber, brackets, screws)
- Heavy‑duty casters or wheels for mobility
- Padding and upholstery fabric for the bench surface
- Basic tools: drill, screwdriver, level, measuring tape
- Optional accessories: resistance bands, smart timer, phone holder
Step 1: Assess Space and Design Layout
Begin by measuring the room where the furniture will reside. Record the floor area, ceiling height, and any nearby obstacles such as doors or radiators. Sketch a simple layout that shows the reformer in its extended position (approximately 86‑inch length for most models) and its folded footprint (about 1.4 sq ft). Ensure the folded dimensions fit beneath a bed, inside a closet, or within a custom bench. This planning stage prevents costly re‑configurations later.
Step 2: Choose a Foldable Reformer
Select a reformer that balances size, weight capacity, and ease of folding. The PAETA Foldable Pilates Reformer offers an 86‑inch frame, adjustable heights, and a 500 lb capacity, making it suitable for families and taller users. Its piano‑wire springs provide smooth, silent motion, and the machine folds to occupy only 1.4 sq ft, which aligns with the space‑saving goal.
Key specifications: price $419.09, rating 4.6 / 5 (286 reviews). The adjustable rope lengths and multiple foot‑bar positions allow the reformer to serve as both a workout station and a supportive bench when folded.
If budget is a primary concern, the WINDFOOT Foldable Pilates Reformer provides a solid 300 lb capacity for $295.99 and a 4.2 / 5 rating (192 reviews). Its pre‑assembled design reduces setup time, and the inclusion of a jump board adds cardio versatility.
For users who prefer a lighter, portable option, the JANUA 5‑in‑1 Pilates Board functions as a compact sliding board with resistance bands, priced at $94.90 and rated 4.2 / 5 (1,261 reviews). Although it lacks the full carriage of a traditional reformer, it can be integrated into a storage ottoman for quick micro‑workouts.
Advanced users seeking a premium balance of features may consider the Dpiolrcag Foldable Pilates Reformer. At $339.99 with a 4.7 / 5 rating (305 reviews), it supports up to 250 lb and includes interchangeable springs and cords for customizable resistance.
Finally, the WNPANE Foldable Pilates Reformer delivers a studio‑size experience in a 77‑inch frame, supporting 400 lb for $299.99 and boasting a perfect 5 / 5 rating (13 reviews). Its smooth carriage and sturdy build make it ideal for integration into a multipurpose bench that also serves as a coffee table.
Step 3: Build a Supporting Frame or Bench
Construct a frame that accommodates the reformer’s extended length while providing a stable base when folded. Use 2×4 lumber or metal square tubing to create a rectangular box that matches the reformer’s width (approximately 22‑inch). Reinforce the corners with metal brackets to prevent wobble. Attach heavy‑duty casters to the bottom if mobility is desired; ensure the casters lock to maintain stability during exercise.
When the reformer is folded, the frame can double as a storage bench. Add a plywood top, upholster with foam padding, and cover with fabric that complements the room’s décor. The PAETA reformer’s adjustable headrest and foot‑bar can rest against the bench’s backrest, allowing the user to transition seamlessly between seated and lying positions.
Integrate the Dpiolrcag’s silent wheels into the bench design by mounting them beneath the plywood surface. This creates a glide path for the carriage when the reformer is unfolded, preserving the quiet operation praised by reviewers.
Step 4: Integrate Storage and Multipurpose Features
Design the bench to conceal the reformer’s components when folded. Install zippered storage bags or fabric pouches on the interior sides to hold springs, ropes, and the jump board. The PAETA model already includes storage bags, which can be repurposed within the bench for a seamless look.
Enhance functionality by adding a built‑in USB charging port or a small shelf for a tablet. The JANUA board’s smart timer and phone holder can be mounted on the bench’s side, enabling users to follow guided workouts without additional equipment.
Consider adding a removable side table that folds out when the reformer is in use. This surface can hold water bottles, towels, or a laptop, turning the workout area into a productive workspace after the session.
Step 5: Test Stability, Adjust, and Finish
After assembly, place the reformer in its extended position on the bench frame. Verify that the carriage glides smoothly across the integrated wheels. Check all bolts and brackets for tightness; the PAETA reformer’s risers require periodic tightening to avoid the occasional scraping sound reported by users.
Perform a series of basic Pilates movements—leg springs, foot‑bar presses, and spine stretches—to assess balance. If the bench wobbles, add cross‑bracing or increase the thickness of the plywood top. Adjust the reformer’s height settings to match the bench’s backrest height for ergonomic comfort.
Once satisfied, fold the reformer and ensure it slides into its storage compartment without obstruction. The final setup should allow the bench to serve as a regular piece of furniture when not in use, preserving the room’s aesthetic while offering a high‑quality Pilates experience.
Tips & Pro Tips
- Use a spirit level during frame construction to guarantee a perfectly horizontal carriage path.
- Apply felt pads to the bottom of the bench’s legs if the floor is prone to scratches.
- Secure the reformer’s springs with zip ties after each workout to maintain consistent tension.
- Invest in a high‑quality yoga mat to place under the bench for added cushioning and noise reduction.
- Schedule a short 10‑minute warm‑up routine on the bench before transitioning to the reformer to prevent injury.
Conclusion
Integrating a foldable Pilates reformer into multipurpose furniture transforms a limited living area into a functional home gym without sacrificing style. By measuring the space, selecting a suitable reformer, constructing a supportive bench, and fine‑tuning stability, readers can enjoy studio‑grade workouts in a compact, elegant solution. The guide empowers individuals to create a personalized fitness corner that adapts to daily life, encouraging consistent practice and long‑term health benefits.
Products Mentioned in This Guide
Frequently Asked Questions
Can a foldable Pilates reformer be hidden inside a storage bench?
Yes, by building a sturdy frame with hinges and a removable bench top, the reformer folds flat and fits inside the bench when not in use.
What type of wood is best for constructing the furniture frame?
Use 2×4 lumber or solid hardwood like pine or oak for strength, and reinforce joints with metal brackets.
Do I need special casters for moving the integrated reformer?
Heavy‑duty lockable casters rated for at least 150 lb each provide stability and easy mobility.
How much clearance is required for the reformer to fold out safely?
Allow at least 3 ft of width and 2 ft of height clearance so the carriage can extend without hitting walls or furniture.
Is additional padding necessary for the bench surface?
A thin layer of high‑density foam topped with upholstery fabric protects the bench and adds comfort for seated exercises.